ESSENTIAL CHOCOLATES • A FORMULA + TECHNIQUE FOR YOUR PERSONALIZED CREATIONS


There are recipes all over the internet that utilize a basic combination of cacao powder plus coconut oil to make chocolate, but the following template is a massive upgrade in potency and flavor from that standard mix! Here you have a simple formula for creating beautiful, high-quality pure chocolates made in small molds or bar form using cacao paste as the base. Making treats this way using this potent, medicinal form of pure cacao are a revelation. You can sweeten to your own taste with whatever you choose, let your imagination run wild and create exciting flavor combinations, and decorate your chocolates so they are a feast for your eyes as well as your tastebuds. There is so much to know about working with cacao paste to create your treats, so read on to get started. The real learning is in experimenting yourself with this alchemical process, so get your hands on some high-quality paste and start melting soon!
To sweeten: I most often use honey as the sweetener for my chocolates in this form. It makes for chocolates that are silky smooth with the most ease. Coconut sugar or other granulated sweeteners won’t dissolve all that well in the melted mixture, so if you do decide to go this route, I highly recommend grinding the crystals into finer powders in a high speed blender or coffee grinder before stirring any into the melted chocolate. As always, I recommend using some non-glycemic, non-liquid sweetener in conjunction with the honey or coconut sugar; it really can serve to mitigate the bitterness of the cacao to help make delightfully tasty treats.
To flavor: Deciding how to flavor your creations is half the fun, and makes this recipe template endlessly variable. I urge you to come up with flavor combinations that you imagine will pique your taste buds and try them out! One non-negotiable for me in these chocolates is salt: adding a big pinch or two of fine sea salt serves to really elevate the flavor experience. Another essential in my opinion is vanilla, which is notorious for complimenting the chocolate flavor. Use vanilla bean powder or scrape the seeds from the inside of a vanilla bean, as vanilla extract won’t work here since you must avoid any moisture or liquid when working with cacao paste. Unfortunately, vanilla prices have recently skyrocketed due to increased demand and environmental factors, so you might choose to leave it out or reduce the amount to conserve your precious stash.
To melt and create: Most importantly, much care and attention needs to be taken in the handling and melting of cacao paste. You need to avoid any contact with water or moisture at all in order to prevent the mixture from irreversibly “seizing,” which is when the chocolate crystals misalign and the mixture suddenly becomes lumpy and dry, and the cacao butter might appear to separate out. To avoid this, DO NOT allow the chocolate to come into contact with any water at all: no wet spoons, not even a minuscule droplet of steam. There is even some contention that the water content of honey can cause the mixture to seize, but this has happened to me only a couple times in my many years of chocolate making. Also, you must avoid any sudden shifts in temperature; for example, don't stick a cold metal spoon into the chocolate while it's melting or put a hot bowl of chocolate down onto a very cold stone counter. Try to have everything at room temperature to begin with, neither hot nor cold. If your chocolate does seize, it is no longer suitable for use in Essential Chocolates, so set the crumbly mixture aside for later use in hot drinks where it will dissolve again and taste fine, and begin your chocolate making anew with more paste and a clean, dry bowl.
I have written this formula to have you start with 300 grams (about 10.5 ounces) as that is a good amount for a small batch of chocolate. You'll need a scale to measure, or you can compare amounts of paste to a purchased bar of chocolate with its weight written on it and just eyeball it. Adding a little extra cacao butter makes for a more melt-in-the-mouth experience and softens the bitterness of the cacao a bit. The ratio of cacao butter to cacao paste here is 1 to 8, but you can experiment with more or less. Adding even more may help with easy tempering, though can lend a waxier feel and less intense flavor to the finished product. You may also add in a small bit of cacao powder for an extra chocolate boost if you like.
⇸⇸⇸ PLEASE BE SURE TO READ THIS POST IN ENTIRETY BEFORE BEGINNING
FIND ALL RESOURCES + PRODUCTS USED BELOW WITH LINKS TO PURCHASE ON THE RESOURCE PAGE 🍫
• ESSENTIAL CHOCOLATE INGREDIENTS •
300 grams (about 10.5 ounces) cacao paste
40 grams (a little less than 1.5 ounces) cacao butter
½ teaspoon vanilla bean powder
big pinch fine sea salt
3 tablespoons of liquid raw honey or coconut sugar ground into a very fine powder, plus more to taste as you desire
optional: non-glycemic sweetener such as powdered monkfruit extract or powdered stevia, as desired to augment sweetness
flavorings to taste (see other posts and this resource list for a multitude of ideas and sources)
EQUIPMENT:
Heatproof glass (Pyrex) bowl to fit over a pot with an inch or two of water
Silicone molds such as these: small square molds, large square molds, small heart molds, large heart molds + chocolate bar molds
Wooden spoon especially for your chocolate making endeavors (no garlic residue please!)
• • • instructions • • •
First, prepare your bain-marie setup. I suggest using a heatproof glass bowl like Pyrex which you will fit over a similar size pot that has a few inches of water in it. Break or cut the cacao paste and cacao butter into small, uniform pieces, and put them in the bowl. Place the bowl over the pot, making sure that the bottom of the bowl is not touching the water. Turn the heat of the burner on the lowest setting possible, as it’s necessary to avoid a lot of steam coming up and coming in contact with the chocolate. If the heat is on the lowest setting, and there is still a lot of steam coming up, move the entire pot and bowl apparatus carefully off of the heat and let the whole thing sit for a few minutes to cool off before trying again, perhaps off the burner using just residual heat.
While the paste is melting, stir it occasionally to facilitate melting and assure an even temperature throughout the bowl (remember, it’s best to use a wooden spoon to stir). As soon as the paste has mostly all melted, turn off the heat, and keep stirring to melt and incorporate any unmelted pieces with the residual heat.
Once the paste is entirely melted, stir in some salt, plus any sweeteners and flavorings, stirring and tasting the mixture to make sure everything is delicious and to your liking. It might take a few tries to get the right flavor balance.
IMPORTANT: Instead of using a spoon dipped into the bowl to taste the mixture each time, let some of the mixture fall from your main wooden spoon onto a smaller spoon or onto the inside of your other fist near the base of your thumb, licking it off to taste it. (The fist thing might sound silly, but is the most sensible way to do multiple tastings without double dipping, so you can get your formulation right! See picture below for a visual.)
Once everything has been added, leave the chocolate bowl to cool a bit, perhaps 10-15 minutes. Then place the bowl back on the double boiler heat, and reheat very slowly and gently just until the chocolate is melted again but is not very hot or overly liquid. It is now ready to pour out, whether into molds or onto a sheet of parchment for "bark." If the chocolate becomes too thick while working with it using, just place the bowl back over the water to gently melt it again. Once the mixture is poured out into your molds, sprinkle over any toppings such as nuts or the like.
Lastly, refrigerate your chocolates until they are just set and hardened, then unmold them or cut or break into pieces. Store in a sealed container in the refrigerator. For best flavor, eat within a week. The chocolates will keep, but the flavor and quality diminishes.
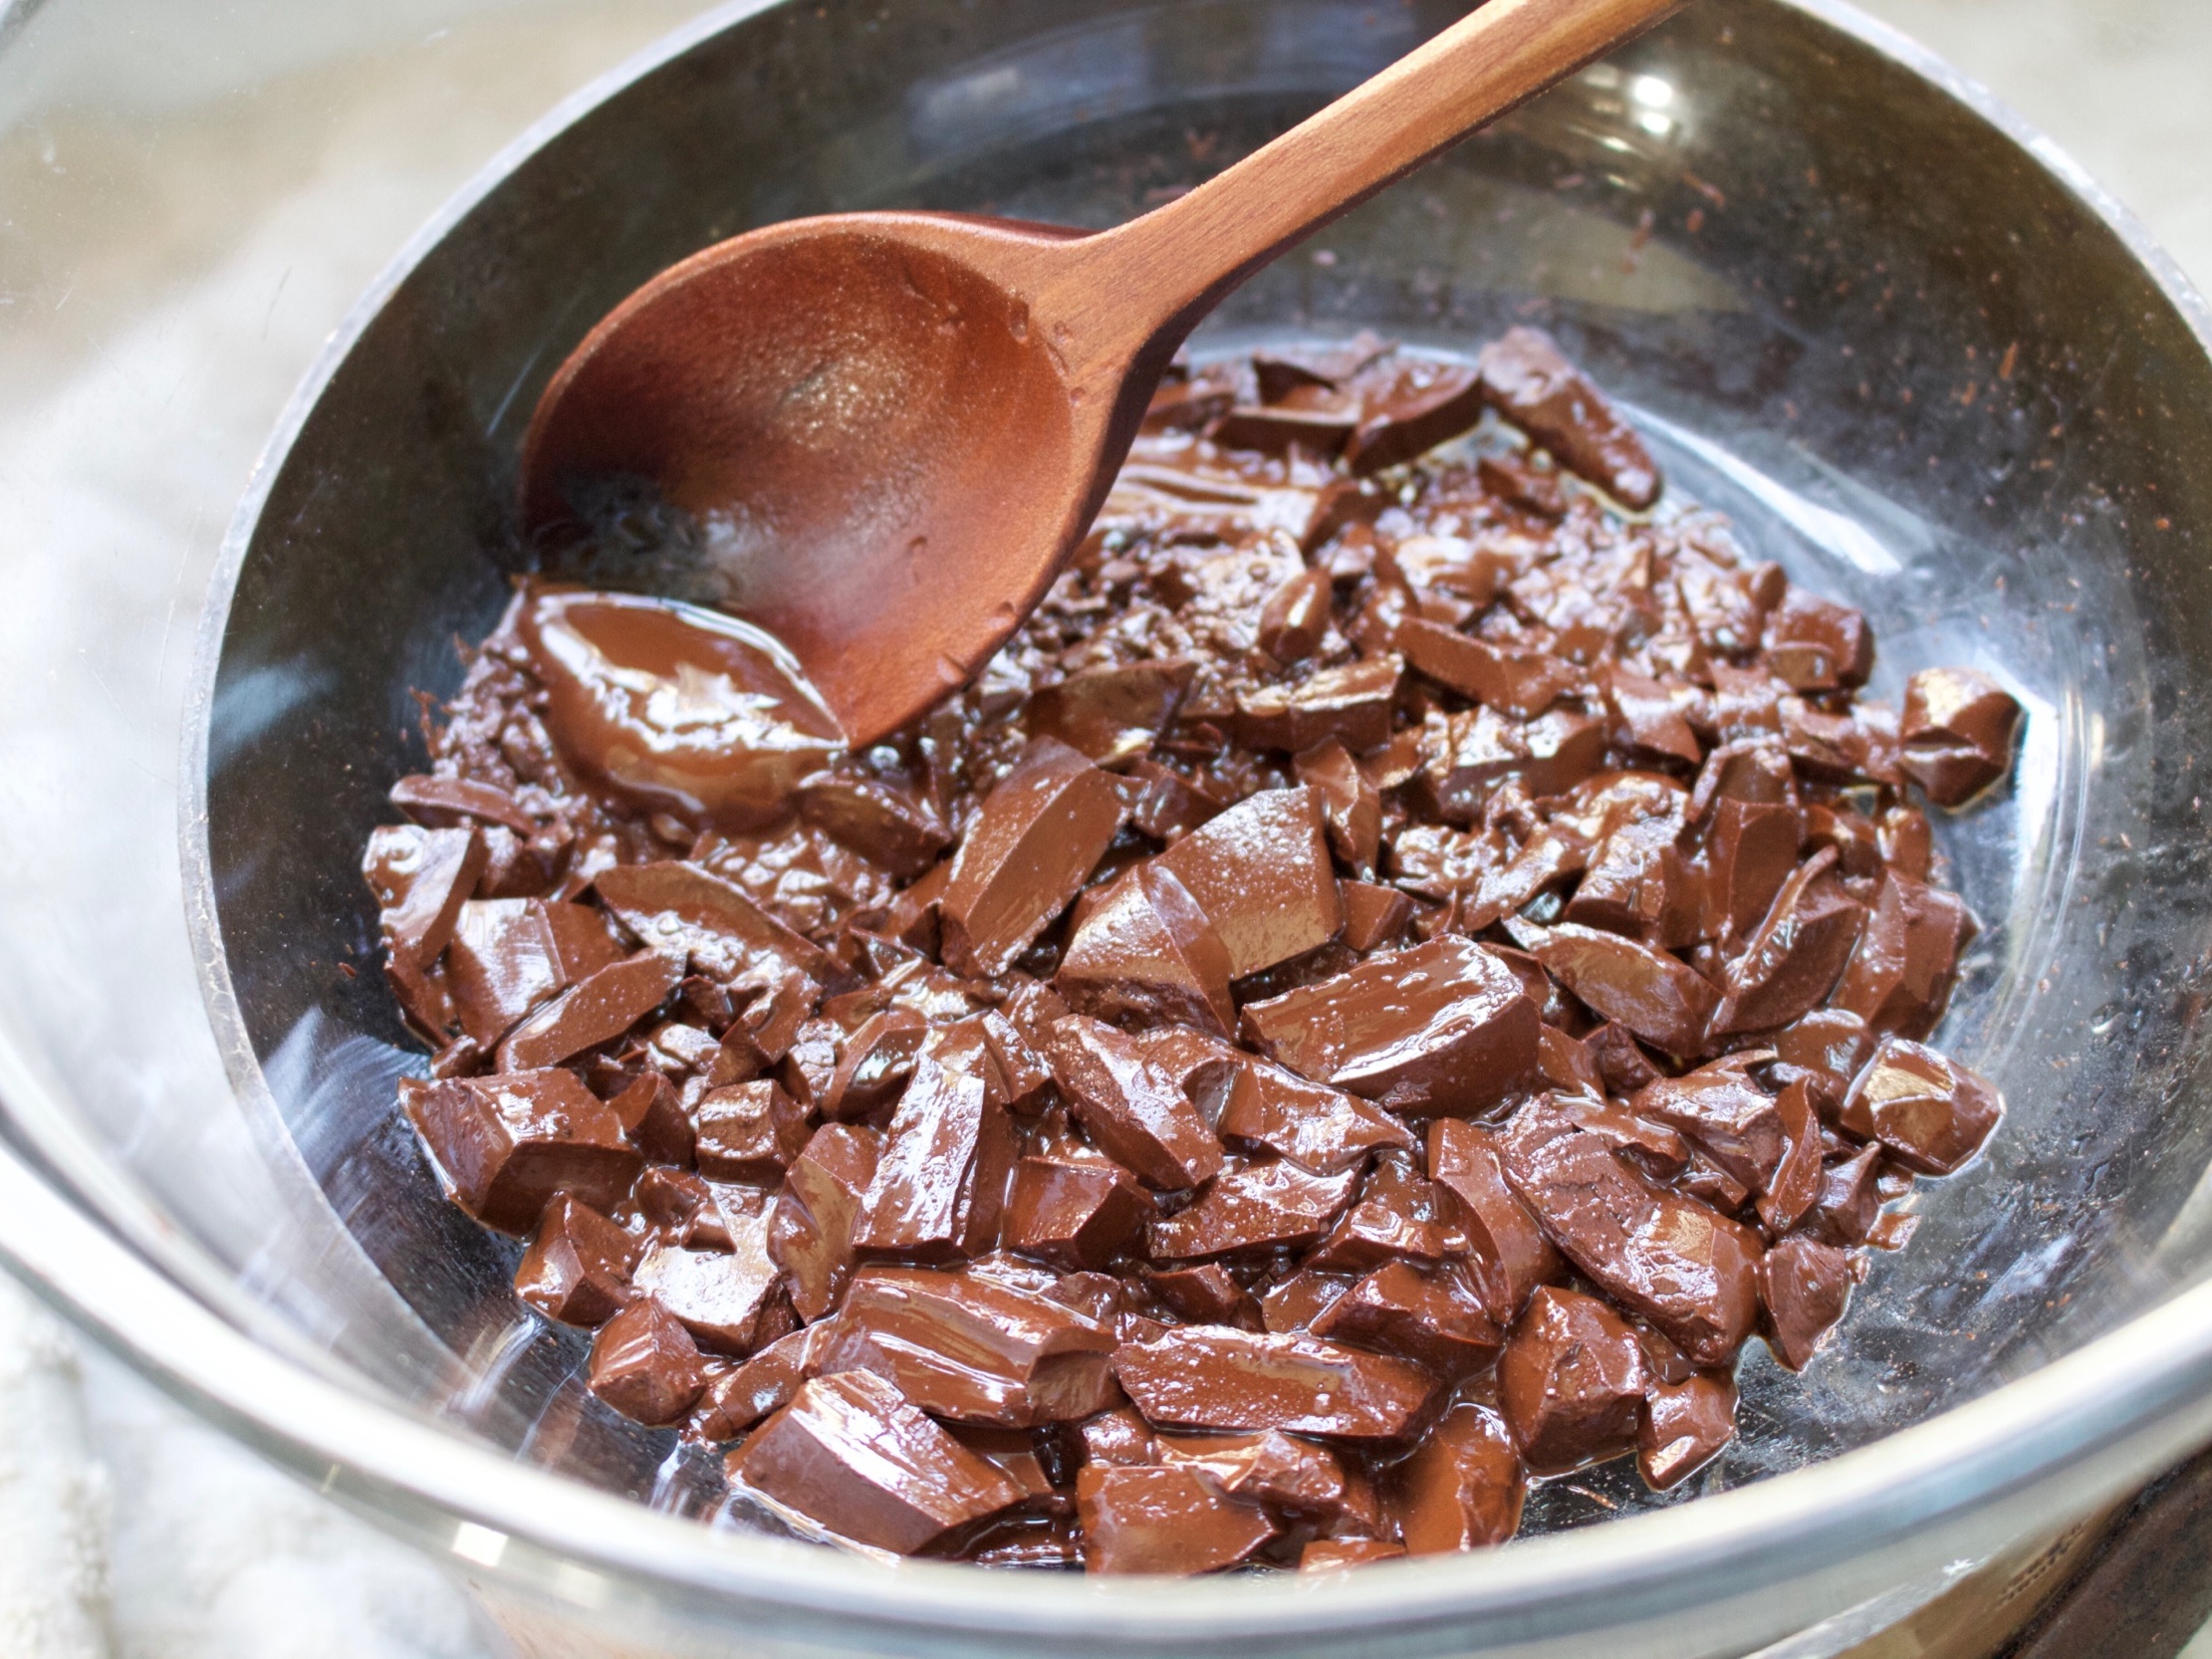
Melting cacao paste for Essential Chocolates
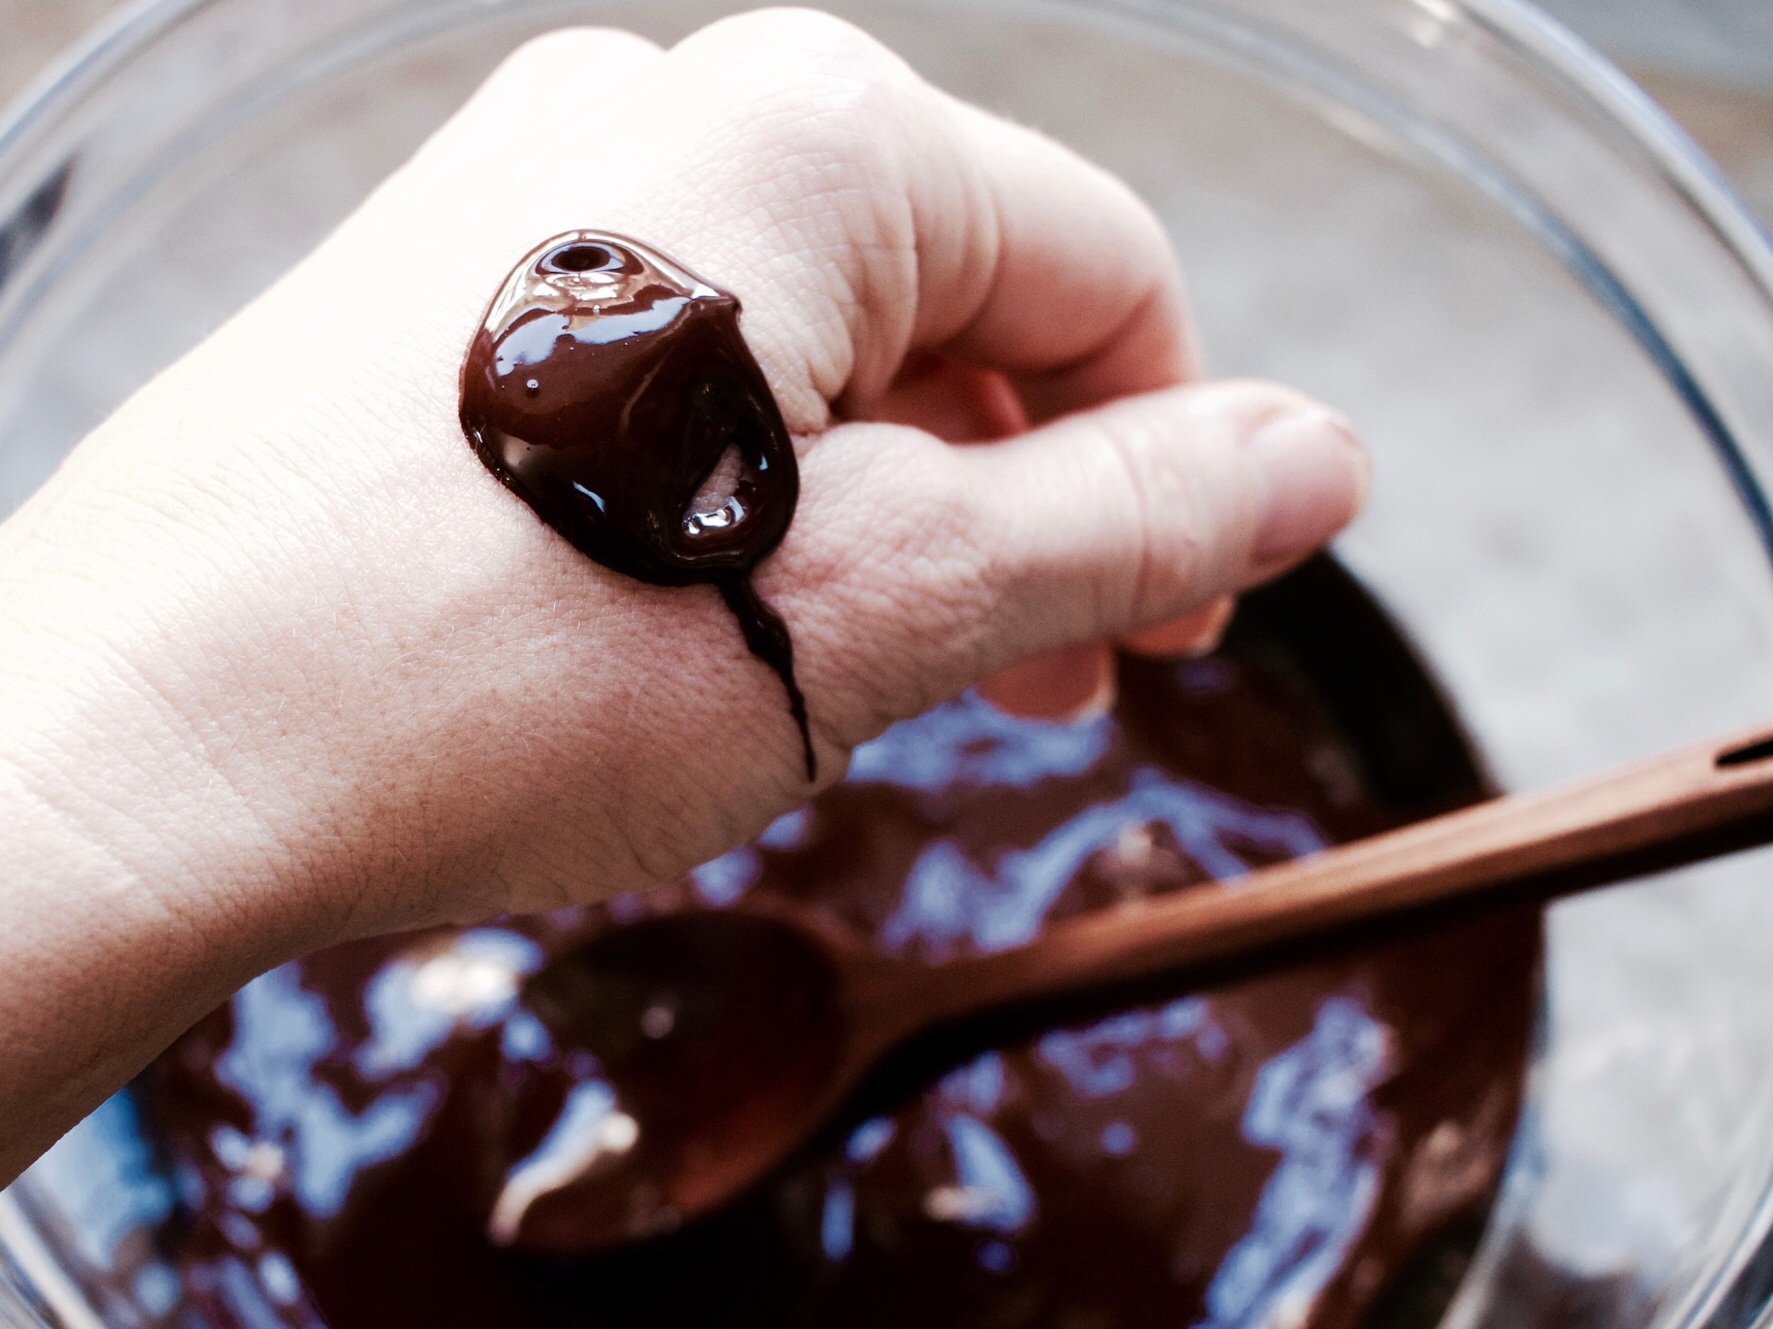
An easy method for tasting chocolate as you go!

Chocolate molds, including easy-to-find silicone ice cube trays

Ideas for Flavors, Toppings & Combinations
•Add any essential oils, spices, medicinal powders, nuts, seeds, and fruits mentioned in the last section. Creative combinations and toppings that lend visual appeal are all encouraged! Dream up
your own flavor combinations to concoct. Usually, if you think something might be good paired with chocolate, it's worth a try to find out if it indeed is!
My own favorite flavor combinations include:
• rose essential oil and chopped dried tart cherries mixed in, then topped with freeze-dried raspberries and/or red rose petals
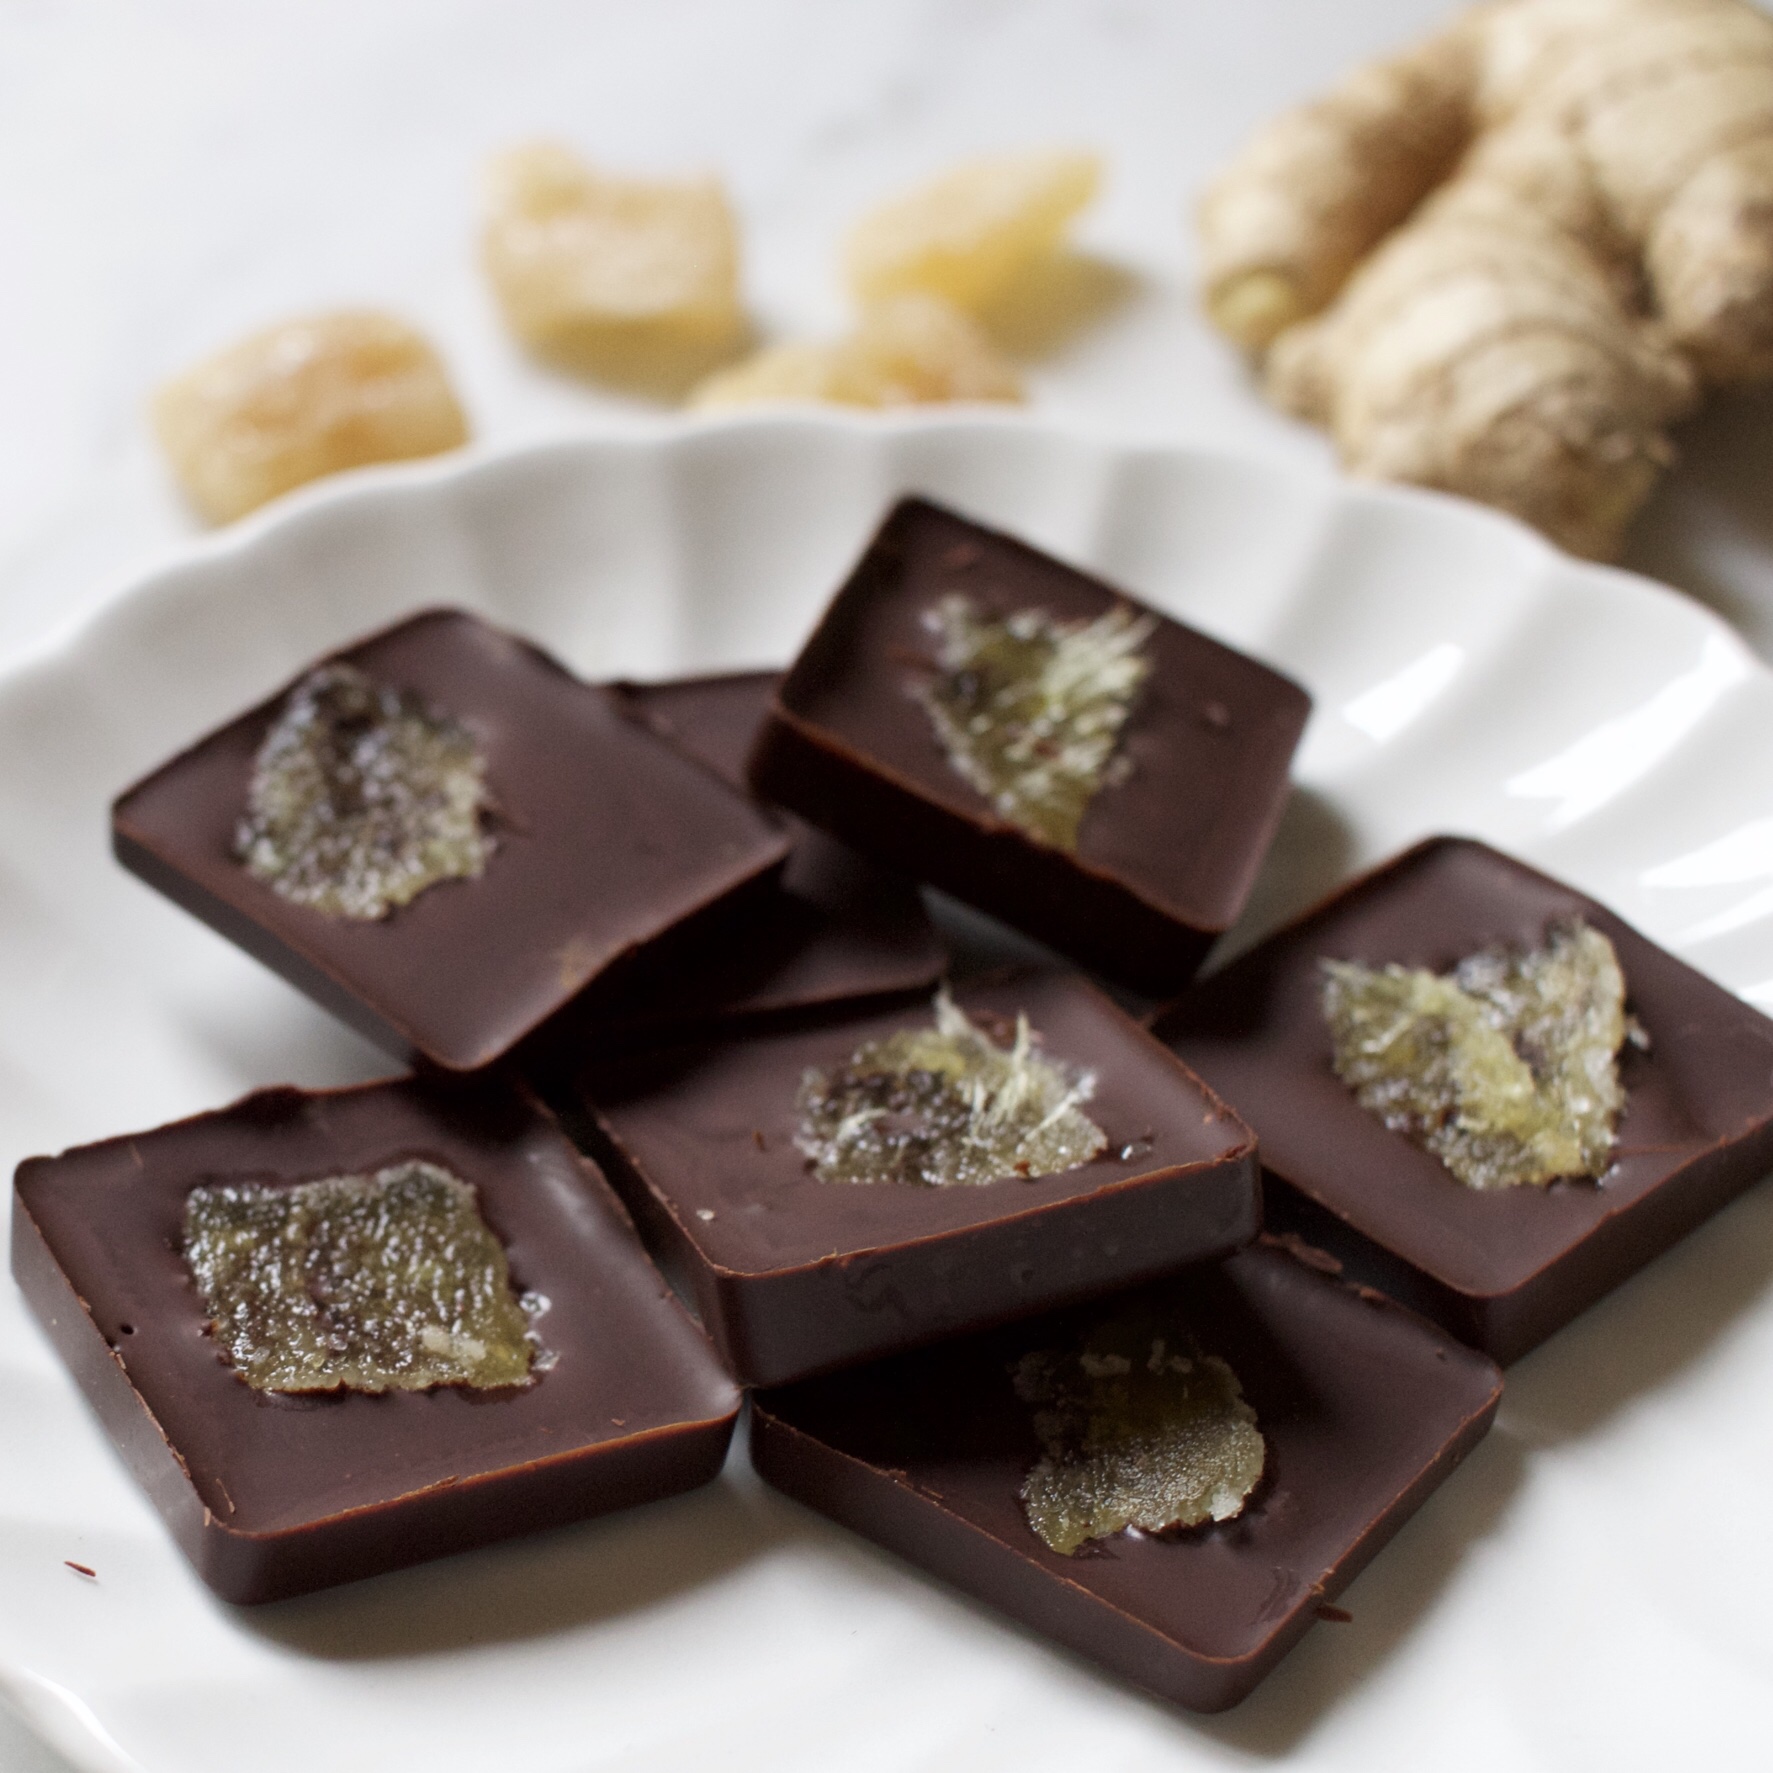
• chopped crystallized ginger mixed in, the top decorated with thin slices of the ginger
• a few spoonfuls of tahini stirred in, perhaps along with some toasted ground sesame seeds as well, topped with toasted seeds and plenty of flaky salt
• ceremonial-grade matcha powder stirred in, then dusted on top once chocolate has cooled off but is not yet completely set
• toasted chopped nuts sprinkled on top along with coarse sea salt such as Maldon
• chopped Turkish figs with cardamom powder, rose oil, and a hint of coffee flavor from a small amount of very finely ground coffee
Ideas for beautiful, tasty toppings:
• flowers such as rose petals, lotus flowers, lavender – fresh or dried
• roasted cacao nibs
• coffee beans, ground or whole
• chopped nuts – toasted, dehydrated, or simply raw
• freeze-dried fruit or regular dried fruit
• bee pollen
• citrus zest or peel – dried or dehydrated is best
• sea salts such as flaky Maldon or smoked salt
Note: To dust the top evenly with a powdery substance like matcha, a spice, or salt, it's best to wait until the chocolate is beginning to set so that it doesn't just disappear into the melted chocolate, especially if you're looking for visual appeal
Click 🍫HERE🍫for all of my favorite RESOURCES in one place
SOME NOTES ON TEMPERING
I get a lot of questions about tempering chocolate, so here are some facts and methods in case you'd like to attempt to temper your own chocolates sometime. It can take a lot of practice and experimentation to master the process, though in some cases, it can happens with dumb luck. I recommend doing additional research to learn more about tempering chocolate if you're interested in really understanding this alchemical process.
What exactly is tempered chocolate?
Cacao paste has six different crystal types. Tempering your chocolate correctly entails lining up just the right amount of the different crystal types perfectly in just the right ratio. Properly tempered chocolate has a dark, smooth, shiny finish, makes a clean, satisfying snap when broken, and is not crumbly or chalky in texture. Tempered chocolate has many advantages: it's shelf stable, won’t melt or get soft at room temperature, and doesn't need to be stored in the refrigerator to stay shiny, snappy, and delicious.
I don’t recommend attempting to master the complicated tempering process in your home chocolate making endeavors right off the bat. Despite the advantages of tempered chocolate, tempering is a process that warrants a lot of effort. Before diving into the process, begin to get familiar with the homemade chocolate process by making several batches and simply store your untempered chocolates in the fridge and eat them within a few days or a week. If you decide to become a tempering master, you will likely need to do more research on the different methods, as there is so much to learn and many subtleties that you will want to be familiar with to really understand and master the process. Commercial chocolate makers have professional equipment that standardizes the process, and there are also small tempering machines meant for home use that real aficionados might invest in.
How to temper using the “seed method”
The easiest way to temper entails using “seeds” to inoculate the chocolate with the proper crystals. For the seeds, you can use any cacao paste that you have that's properly tempered, meaning it breaks cleanly and with a snap, even if it does have a wee bit of dusty bloom on the outside. You can also use cacao butter as seeds.
METHOD: In a double boiler over hot or simmering water, bring the cacao paste to 115°, then down to 100°. Then mix in 1/3 weight of new, prior-tempered chocolate as “seeds” and stir the mixture until the seeds are melted. Add in any other ingredients, and then cool the entire mixture to 90° before pouring into molds.
How to temper using the heating and cooling method
This method includes heating and cooling to certain temperatures to achieve temper so you will need a suitable thermometer.
METHOD: In a double boiler over hot or simmering water, bring the cacao paste to 115° to break crystallization. Stir in any other ingredients until incorporated. Cool it down swiftly by stirring constantly until it is at 81°, and then reheat to around 88°.
____________________________________
<< To go back to main page with all of the chocolate posts click 🍫HERE🍫
Click 🍫HERE🍫for all of the chocolate RESOURCES in one place >>